In this tutorial we will set up and use django-allauth app for third party authentication from various social networking sites like Facebook, Google and Twitter.
Django-allauth is a great app to streamline both local website login and Social account logins. Django allauth supports all main social providers and most of the steps from registration to login work out of the box. You can read its features and installation steps in the official documentation here. Now, let us see how to set it up and fetch user data from Authentication Providers.
Install the django-allauth
pip install django-allauth
Now add the app to your project setting:
	INSTALLED_APPS = (
		...
		'allauth',
		'allauth.account',
 		'allauth.socialaccount',
		'allauth.socialaccount.providers.facebook',
		'allauth.socialaccount.providers.github',
		'allauth.socialaccount.providers.google',
		'allauth.socialaccount.providers.linkedin',
		'allauth.socialaccount.providers.linkedin_oauth2',
		'allauth.socialaccount.providers.stackexchange',
		'allauth.socialaccount.providers.twitter',
		....
	)

	TEMPLATE_CONTEXT_PROCESSORS = (
 		...
		'django.core.context_processors.request',
		'django.contrib.auth.context_processors.auth',
		'allauth.account.context_processors.account',
		'allauth.socialaccount.context_processors.socialaccount',
		...
		)
You also need to set the AUTHENTICATION_BACKENDS setting. You should keep admin login by username regardless of allauth
AUTHENTICATION_BACKENDS = (
	# Needed to login by username in Django admin, regardless of `allauth`
	'django.contrib.auth.backends.ModelBackend',
	# `allauth` specific authentication methods, such as login by e-mail
	'allauth.account.auth_backends.AuthenticationBackend',
	)
Set the Redirect url to root of your website.
LOGIN_REDIRECT_URL = '/'
Setting for requesting email from social account
SOCIALACCOUNT_QUERY_EMAIL = True
Social provider specific setting, here I am setting the Facebook authentication procedure to js_sdk rather than oauth2
SOCIALACCOUNT_PROVIDERS = {
    'facebook': {
        'SCOPE': ['email', 'publish_stream'],
        'METHOD': 'js_sdk'  # instead of 'oauth2'
  }
}
Now add allauth urls to you project main urls.py:
url(r'^accounts/', include('allauth.urls')),
Sync the database
python manage.py syncdb
In case you are using south, then you can run:
python manage.py migrate allauth.socialaccount
Run the same command for all the providers in the installed apps list.
python manage.py migrate allauth.socialaccount.providers.facebook
Note: I would suggest python manage.py syncdb –all, as you would not change the schema of allauth.
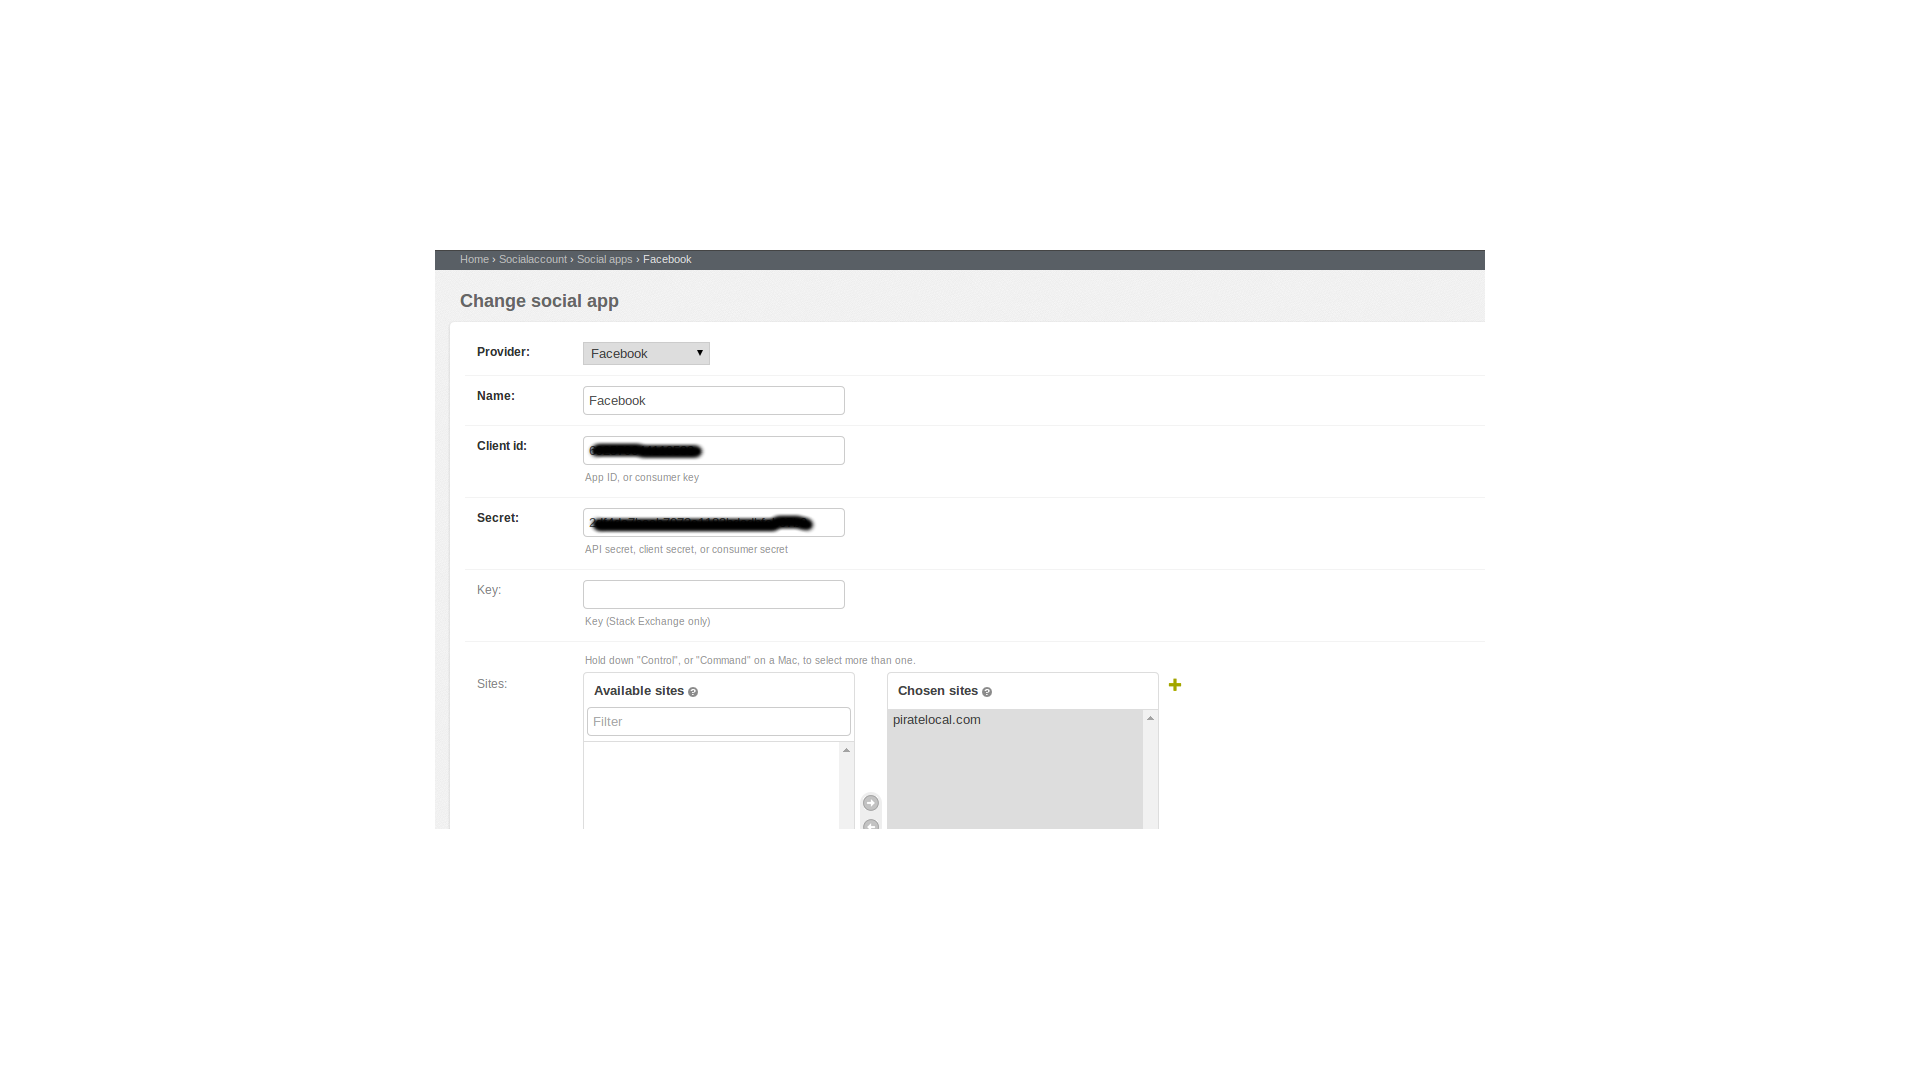
Now you can open the admin page of your website and can see the tables of allauth in Socialaccount section. Here, I will setup the facebook app in admin section, for you need to configure the app before using any service providers functionality.
Create facebook app for your website and configure the client_id and secret in the Social Apps table.

Note: Make sure your SITE Table points to your Domain. e.g. http://www.piratelearner.com
In the same manner configure all other social account apps.
Now you can login to social account facebook with the url
yourdomain.com/account/login
Currently the template is an ugly one, you can find it at:
allauth/templates/account/login.html
Sample Code would look something like this
	{% load i18n %}
	{% load account %}
	{% block content %}
	<h1>{% trans "Sign In" %}</h1>
	{% if socialaccount.providers %}
	<p>{% blocktrans with site.name as site_name %}Please sign in with one of your existing third party accounts. {% endblocktrans %}</p>
	<div class="socialaccount_ballot">
 	<ul class="socialaccount_providers">
	{% include "socialaccount/snippets/provider_list.html" with process="login" %}
	</ul>
	<div class="login-or">{% trans 'or' %}</div>
	</div>
	{% include "socialaccount/snippets/login_extra.html" %}
	{% else %}
	<p>{% blocktrans %}You have not created an account yet {% endblocktrans %}</p>
	{% endif %}
	{% endblock %}
Now all you need to do is to access the data from the social account.
There are two ways to check for social account information during login/sign-up:
You can catch the signal emitted by allauth to access the information:
		@receiver(pre_social_login)
		def CreateProfile(sender, request, sociallogin, **kwargs):
			"""
			This function catches the signal for social login and print the extra information
			"""
			print "LOGS: Caught the signal--> Printing extra data of the acccount: \n", sociallogin.account.extra_data
There is also a provision for sub-classing social account adapter and implement the pre_social_login function if you have Profile table and want to store some information:
		from allauth.account.adapter import DefaultSocialAccountAdapter
		class MyAdapter(DefaultSocialAccountAdapter):
			def pre_social_login(self, request, sociallogin):
				“””
					check for data and save what you want.
				“””
				print "LOGS: Caught the signal--> Printing extra data of the acccount: \n", sociallogin.account.extra_data
and set following in setting.py:
SOCIALACCOUNT_ADAPTER = 'myapp.my_adapter.MyAdapter`
Now if you want to access this information in your views then:
account_uid = SocialAccount.objects.filter(user_id=request.user.id, provider='facebook')
Note: change provider to “google” and “twitter” for Google+ and Twitter respectively
This will return you the list of facebook account connected to the user currently logged-in.
You can now extract information from this object using following methods:
	account_uid[0].get_avatar_url()
	account_uid[0].extra_data['username']
	account_uid[0].extra_data['first_name']
	account_uid[0].extra_data['last_name']
	account_uid[0].extra_data['gender']
	account_uid[0].extra_data['email']
	account_uid[0].extra_data['link']
	account_uid[0].extra_data['uid']
If You want to access them in template directly then:
{% for account in user.socialaccount_set.all %}
        <h2 style="text-transform:capitalize;">{{ account.provider }} account data</h2>
        <p>UID: <a href="{{account.extra_data.link }}">{{ account.uid }}</a></p>
        <p>Username: {{ account.extra_data.username }}</p>
        <p>First Name: {{ account.extra_data.first_name }}</p>
        <p>Last Name: {{ account.extra_data.last_name }}</p>
        <p>EMAIL: {{ account.extra_data.e }}</p>
        <p>Profile Link: <a href="{{ account.extra_data.link }}">{{ account.extra_data.link }}</a></p>
        <p>Gender: {{ account.extra_data.gender }}</p>
        <p>Birthday: {{ account.extra_data.birthday }}</p>
{% endfor %}
There are more features in allauth, for example removing the LOG-OUT confirmation page and EMAIL verification procedure, connecting various social account to local account and many other options.
For this information you can visit the official documentation page of Django-allauth, all settings are well documented there.
